
GRAB MY FREE TRAINING
The No Leaks Funnel

GRAB MY FREE APP
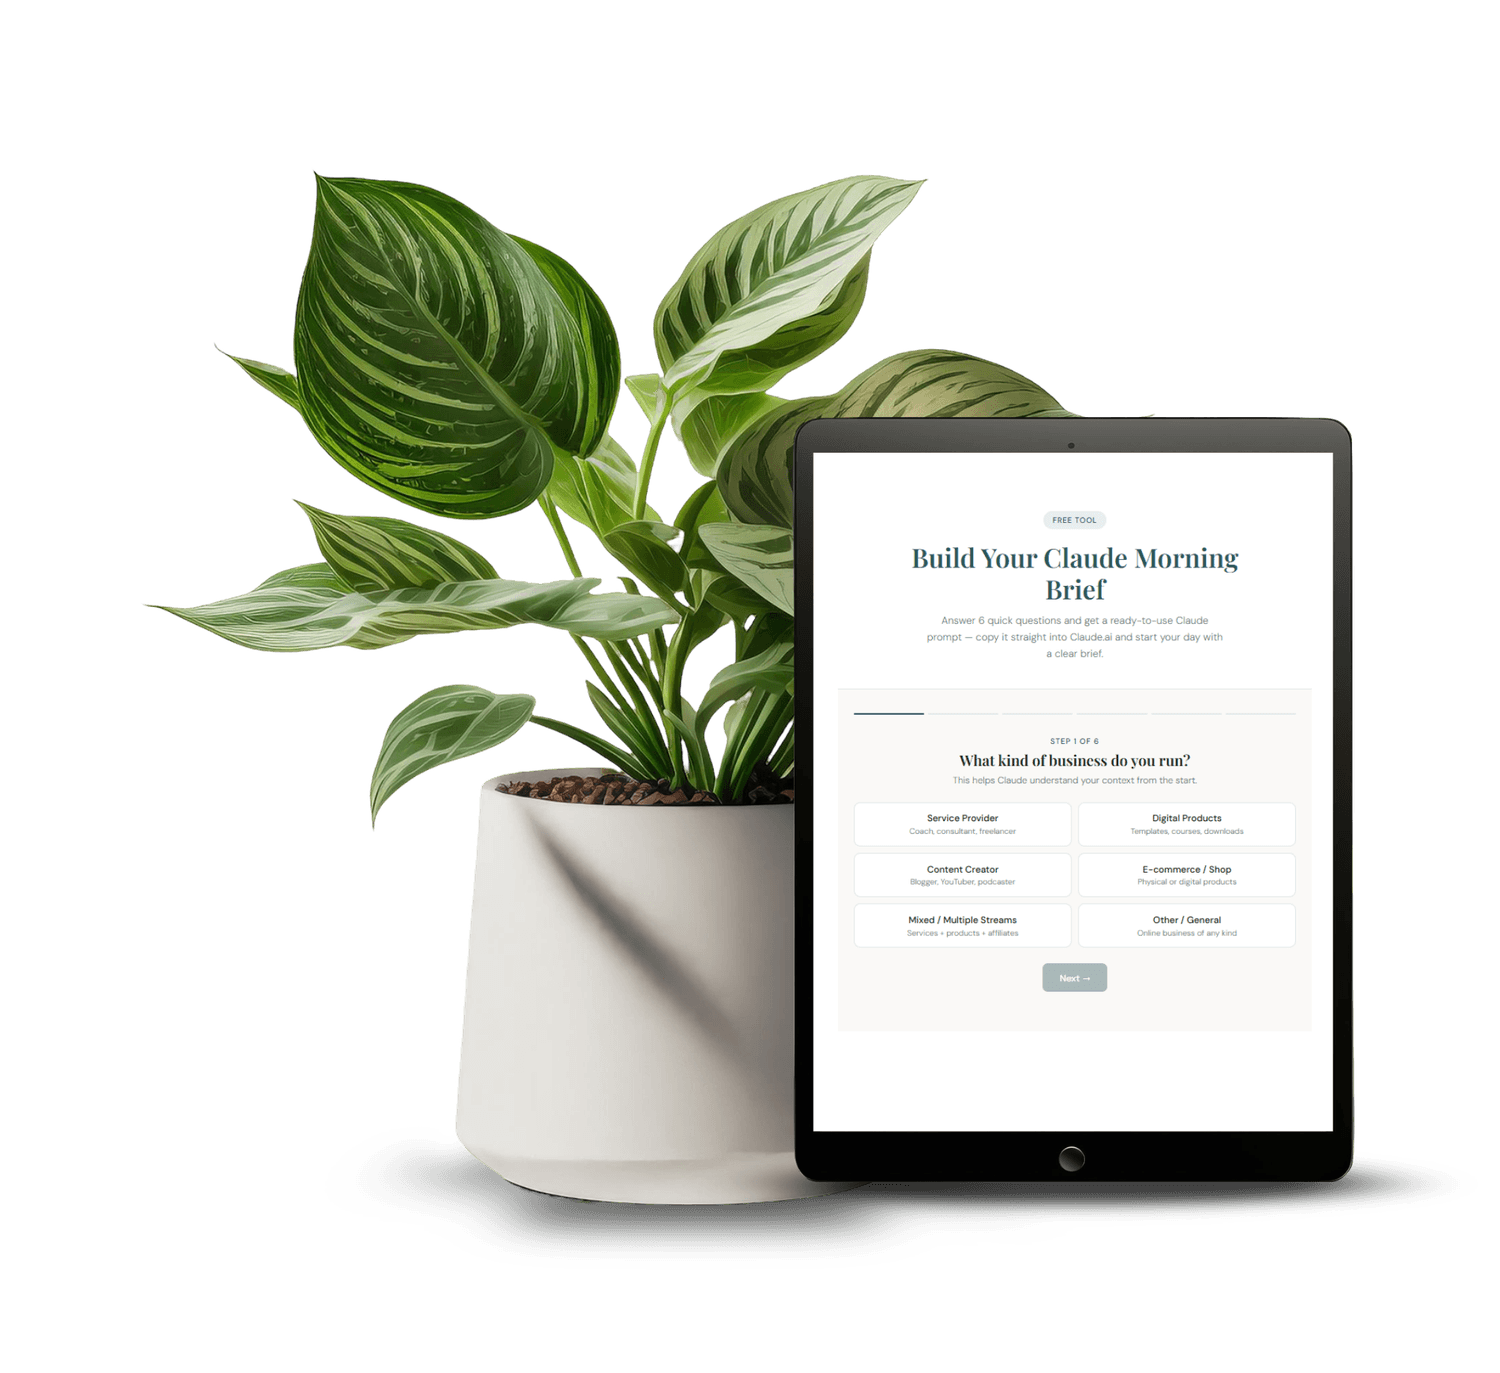
Morning Brief Claude AI Prompt
Set-up your custom morning brief for Claude
GRAB MY FREE APP
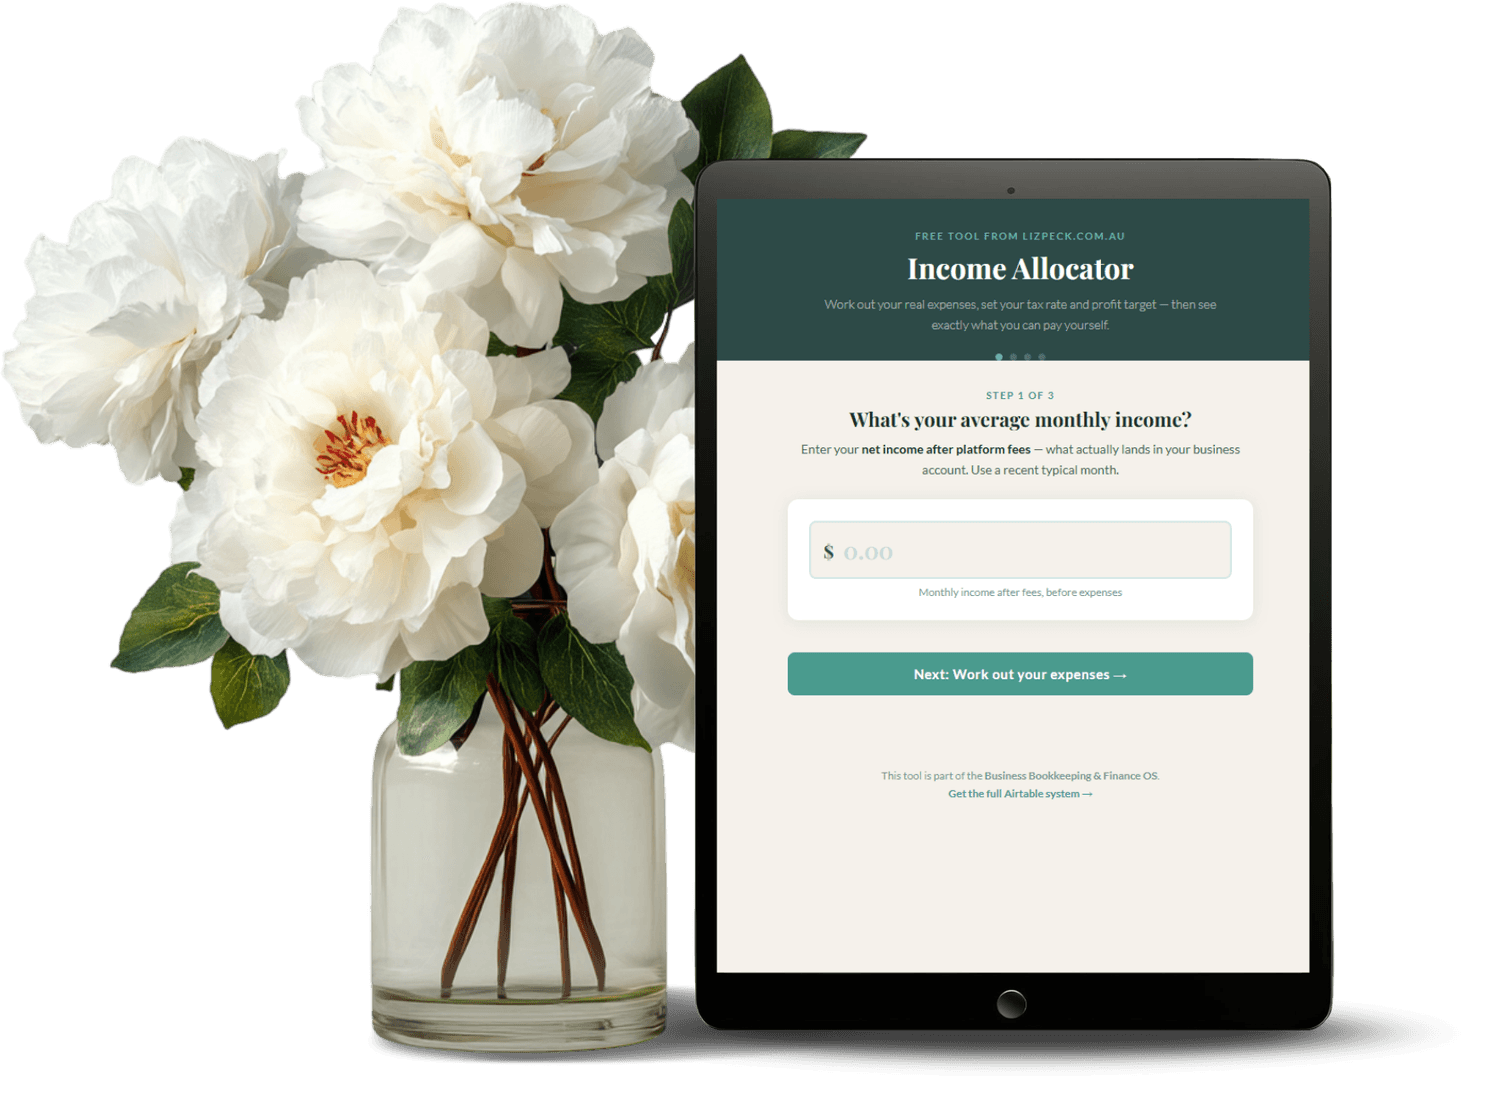
Income Allocator
Work out how to break down your income properly with percentages
How to Set Up a Simple Project Management System in Airtable for a Solo Business
Most project management tools are built for teams. If you're running a solo business, the overhead of those systems — the setup, the boards, the moving pieces — ends up being more work than the actual project.
Airtable is different because you can make it exactly as simple or as complex as you need. And for a solo business, simple is usually the right answer.
Here's the exact setup I use and recommend — two tables, a handful of views, and a weekly habit that keeps it all working without maintenance.
Why Most Systems Get Abandoned
The problem with most project management setups isn't the tool — it's that they were built for a moment of enthusiasm rather than a sustainable weekly habit.
You set up all the columns, add the labels, build the colour-coded boards. Then real work starts and the system gets ignored because updating it feels like a second job.
The fix is radical simplicity. A system you'll actually use is better than a perfect system you won't. Everything in this setup is designed to take under ten minutes a week to maintain.
The Two Tables You Actually Need
You need a Projects table and a Tasks table. That's it.
Projects are the big things: the launch, the product, the client engagement, the website rebuild. Tasks are the individual actions that move each project forward.
Linking them together in Airtable means you can see all tasks for a given project in one click, or see which project every task belongs to. This relationship is what makes the system useful — without it you just have two unconnected lists.
Setting Up Your Projects Table
Your Projects table needs about five fields to be functional. Project Name, Status (Active, Paused, Complete), Due Date, a linked field to your Tasks table, and a Notes field for anything that doesn't fit elsewhere.
You don't need a priority score, a complexity rating, a percentage complete field, or a custom status colour. Those are for teams. For you, a quick glance at the Status field tells you everything.
Keep the Active projects to a manageable number — five or fewer is a good rule. If you have more than that in flight, something needs to be paused or cut.
Setting Up Your Tasks Table
Your Tasks table does a bit more work. You need: Task Name, linked Project, Status (To Do, In Progress, Done), Due Date, and an optional Notes field.
I'd also add a checkbox field called something like "Focus Today" — a simple flag you check on the three to five tasks you're actually working on today. This is your daily filter, and it's what makes the system feel manageable rather than overwhelming.
Don't add more fields than this until the basic version has been running for a month. Complexity creep is what kills these systems.
The Views That Make It Useful
Airtable's views are where the system becomes practical rather than just organised. Create three views in your Tasks table.
First: a Today view filtered to Focus Today = checked. This is your working view — the only tasks on your radar right now. Second: a By Project view grouped by linked Project, so you can see everything outstanding for each piece of work. Third: a Weekly view filtered to tasks with Due Dates in the next seven days, so nothing sneaks up on you.
In your Projects table, create an Active view filtered to Status = Active. That's your weekly planning view — the only projects you're moving forward right now.
The Weekly Habit That Keeps It Working
The system only works if you touch it once a week. Not daily — weekly. Monday mornings, fifteen minutes.
Open your Active Projects view. For each active project, check what's still outstanding, add any new tasks you're aware of, and archive anything that's done. Then open your Weekly Tasks view and check the due dates are still realistic. Move anything that's slipped.
That's the entire maintenance routine. Fifteen minutes on Monday means the rest of the week you're just opening the Today view and working from it — no decision fatigue, no hunting for what's next.
Connecting It to Your Daily Work
The system only saves you time if you actually open it when you sit down to work. I keep my Airtable base bookmarked and the Tasks table open as a tab I default to at the start of every work session.
At the start of each day, I check the Focus Today view, flag three to five tasks I'm actually going to do, and close everything else. That's my work list for the day.
If you're building this alongside a broader Airtable Business OS, the Tasks table connects naturally to your content calendar, client records, and everything else — so tasks show up in context rather than as a separate list you have to remember to check.
What Not to Track in This System
Not everything needs to be in your project management system. Things like recurring weekly tasks (your newsletter, your invoicing, your Monday review) are better handled in a separate routine tracker or as calendar blocks — not as Airtable tasks you create and complete every single week.
Client work with its own tools also doesn't belong here. If a client has their own project management system, use that for client-facing tasks and use this system for your own backend work.
The cleaner the boundary, the more useful the system. If everything goes in here, it becomes noise.
Building on the Foundation
Once this two-table setup is running smoothly, you can layer on more without breaking what you have. A Content Hub that links to tasks. A Products table that links to launch projects. An Expenses table that tracks what each project is costing.
That's how I built my own system - starting with the simplest version that actually worked, and adding tables only when I felt the gap clearly enough to know what I needed.
If you want the full structure I use to run my business in Airtable - including the project and task setup plus all the other tables that connect to it - the CEO Control Centre is the ready-built version you can start from instead of building from scratch.
FAQ
Is Airtable good for project management for one person?
Yes - it's actually better suited to solo use than most dedicated project management tools because you can build exactly what you need without all the team-collaboration overhead. A simple two-table setup takes under an hour to create and works well immediately.
Do I need the paid version of Airtable?
No. The free plan is more than enough for a solo business project management setup. You can have multiple bases, multiple tables, and all the views you need on the free tier.
How is this different from just using a to-do list app?
The linked tables are the difference. A to-do list app gives you tasks. Airtable lets you see tasks in the context of the project they belong to, filter by project, and connect your work to other parts of your business data - like your content calendar or your products.
How long does it take to set this up?
The basic two-table setup takes about 30 to 45 minutes if you follow a clear structure. Getting the views right and populating your current projects takes another 30 minutes. You could be running it by this afternoon.
What if I already have a project management tool I'm not using?
Start fresh in Airtable rather than migrating. Migrations almost always drag in the complexity of the old system. A clean start lets you build only what you actually need.
Disclaimer:
This website may contain affiliate links. If you click a link and make a purchase, I may receive a small commission at no extra cost to you.

About Liz Peck
Liz Peck helps online business owners build the backend that runs without them - using Airtable for operations, Systeme for sales, and Claude AI for the work you hate doing twice. lizpeck.com.au

Disclaimer:
This website may contain affiliate links. If you click a link and make a purchase, I may receive a small commission at no extra cost to you.